Military Vehicles

For some years now the Sandstone Heritage Trust has worked closely with the Armour Museum in Bloemfontein to identify historically significant Classic Military vehicles to rescue them and to restore them to working order. From time to time special events are held which showcase these vehicles to the general public. This is in line with the Defence Force's desire to be seen as a valuable contributor to society in many different ways. We are currently working on an expansion of our relationship with the museum and this will be reflected in more news on Classic Military Vehicles on our web site.


Our pictures give an indication of the vehicles which are jointly owned and operated by the School of Armour and in association with our Narrow Gauge railway and in association with some of South Africa's top vintage and classic aircraft, many of which have a military origin. Our photographs show both a Tiger Moth and a pair of Harvards which joined us recently for one of our joint military vehicle displays. It is our intention to further develop our relationship with organisations such as the Harvard Club of South Africa and the Tiger Moth Club of South Africa.

Update on the restoration of rare 3-axle Oshkosh Tank Transporter

31st March 2010

Jan Fouche has provided the following photographs and captions on the ongoing work of the Oshkosh.

Alternator_removed_to_repair_broken_mounting
Alternator removed to repair broken mounting

Battery_box_repaired_and_primed
Battery box repaired and primed

Battery_box_with_floor_panel_badly_rusted
Battery box with floor panel badly rusted

Battery_box_with_rusted_floorplate_cut_out
Battery box with rusted floorplate cut out

Cab_interior_with_old_carpeting_being_removed
Cab interior with old carpeting being removed

Cab_top_ventilator_coated_with_MS_Primer
Cab top ventilator coated with MS Primer

Exhaust_cleaned_up_and_new_flexible_hose_to_be_fitted
Exhaust cleaned up and new flexible hose to be fitted

Front_fender_with_body_filler_applied_to_small_dents
Front fender with body filler applied to small dents

Front_of_truck_with_radiator_and_fender_refitted
Front of truck with radiator and fender refitted

Front_of_truck_with_radiator_refitted
Front of truck with radiator refitted

Instrement_panel_with_some_gauges_removed_to_repair_and_cleaned
Instrument panel with some gauges removed to repair and be cleaned

Left_front_fender_in_position
Left front fender in position

Left_front_fender_with_MS_Primer_applied
Left front fender with MS Primer applied

Left_front_side_now_ready_to_be_painted
Left front side now ready to be painted

New_baseplate_for_battery_box_mounting_coated_with_primer
New baseplate for battery box mounting coated with primer

New_battry_box_cover_witch_also_acts_as_the_step_on_the_right_hand_side
New battery box cover which also acts as the step on the right hand side

One_of_the_old_gauges_repaired_and_cleaned_up_ready_to_be_refitted
One of the old gauges repaired and cleaned up ready to be refitted

Right_front_fender_back_in_place
Right front fender back in place

Right_front_fender_coated_with_MS_Primer
Right front fender coated with MS Primer

Right_front_side_almost_ready_to_be_repainted
Right front side almost ready to be repainted

Some_new_gauges_fitted
Some new gauges fitted

The_battery_box_with_one_of_the_corners_welded
The battery box with one of the corners welded

The_broken_alternator_mounting
The broken alternator mounting

The_cab_coated_with_MS_Primer
The cab coated with MS Primer

The_exhaust_pipe_with_rusted_flexible_hose_cut_off
The exhaust pipe with rusted flexible hose cut off

The_exhaust_welded_together_and_refitted
The exhaust welded together and refitted

The_front_of_the_truck_now_looking_much_better
The front of the truck now looking much better

The_fuel_tank_cleaned_inside_and_sprayed_with_primer
The fuel tank cleaned inside and sprayed with primer

The_fuel_tank_refitted_to_the_truck
The fuel tank refitted to the truck

The_other_front_fender_being_repaired_with_body_filler
The other front fender being repaired with body filler

The_rusted_battery_box_floorplate
The rusted battery box floorplate


HTN 63 - Army spec Bedford found along the Garden Route in the Cape - to be fully converted

Sandstone Heritage Trust - News

HTN 63 - Army spec Bedford found along the Garden Route in the Cape - to be fully converted

17th March 2005
While the Sandstone Heritage Trust is not concentrated on old commercial vehicles, we do have some interesting old items. For example South Africa’s oldest commercial vehicle – a 1910 Peerless is part of our commercial vehicle collection. We have spent a lot of time looking for a suitable army spec Bedford.

We found this one along the Garden Route in the Cape. It is a military spec that has been converted for use in a mining application.

During 2006 it will be re-converted to a full spec Military Bedford.
01
Below is a picture of two of our military commercial vehicles already restored –
a Diamond T and a 1942 Dodge Power Wagon.
02

HTN 91 - It goes around Earphones and Helmets.

Sandstone Heritage Trust - News

HTN 91 - It goes around Earphones and Helmets.

22nd May 2006

Anybody who was in the Armoured Corps at that time, knows that wearing earphones (for both the radio and the Armoured Car's intercom) at the same time as a steel helmet, consisting of a plastic liner 'mosdop', and the steel outer 'staaldak', will tell you that it's somewhere between very uncomfortable, and impossible.

Parade ground photos of men in tanks and armoured cars, wearing black berets and shiny silver badges, with earphones on top, look very smart. But these photos were taken under operational conditions on the Northern border of South West Africa, now Namibia, where wearing a helmet was an unpleasant necessity! The earphones had to be squeezed in under the headband of the helmet, with the strap which was supposed to be over the top of your head, hanging down behind your ears, which in turn were being pushed downwards by the rubber mouldings of the earpieces!

Our Sergeant hit on the idea of 'borrowing' aircraft type helmets from the lads in light blue, and supported his suggestion to the top brass with these photographs.
01

These were taken in the days before these locally made Armoured Cars were called Elands. This was called a VA Mk3 / 60, equipped with a 60mm Breech Loading Mortar as main armament. Crew Commander (Cpl Selfe) sits in the turret on the left, his Gunner (Trooper Bezuidenhout) on his right, and Driver (Trooper Kleynhans) in the hull.
02
Looking much more comfortable and professional are Cpl Pretorius's crew in a VA Mk3 / 90. This is the same model as the one in the Sandstone Heritage collection, with the 90mm DEFA gun.

Just to show Armoured Cars run in the blood, attached is a photograph of my father, also as Crew Commander (below, in the middle) in May 1942, outside Gazala in the Western Desert. They are sitting on a Marmon Harrington Mark 4, one of 5 746 which were also made in South Africa.

Andy Selfe
03

BTW, do you know how the School of Armour / 1 Special Service Battalion works, or used to? School of Armour is the place where Officer and NCO 'material' was sent, like an Army Gymnasium, a few months prior to a normal intake into 1SSB. The unsuccessful candidates were 'Returned ot Unit' to us in 1SSB. Those who 'made it' came down to us as our officers and NCOs. Some of us who showed promise, were promoted 'out of the ranks' from 1SSB itself.

1SSB had mostly Armoured Car squadrons, and less Tank Squadrons. Much rivalry existed!
 

Carrying on with the restoration of rare 3-axle Oshkosh Tank Transporter


1st March 2010

Like so many projects, particularly vehicles, they often look better than they really are. Jan Fouche has sent us a plentiful supply of good photographs clearly indicating the amount of detailed restoration work that has been dealt with. For people who leave things standing outside be aware that you will pay the price in due course if you ever decide to restore it.

The photographs give a good account of the work that is involved.

A_rusted_section_of_the_bonnet_to_be_cut_out
A rusted section of the bonnet to be cut out

A_section_on_the_other_side_of_the_bonnet_cut_out
A section of the other side of the bonnet cut out

A_spot_cleaned_up_to_remove_rust_and_repair_with_body_filler
A spot cleaned up to remove rust and repair with body filler

Air_compressor_housing_with_a_crack_leaking_water
Air compressor housing with a crack leaking water

Air_compressor_piston_and_conrod_removed_to_repair_stripped_conrod_bolt
Air compressor piston and conrod removed to repair stripped conrod bolt

Air_compressor_water_supply_hose_completly_blocked_causing_overheating
Air compressor water supply hose completely blocked causing overheating

Another_angle_of_the_bumper
Another angle of the bumper

Another_angle_of_the_diesel_pump
Another angle of the diesel pump

Another_angle_of_the_steering_box
Another angle of the steering box

Another_foto_of_the_oil_leaks
Another photo of the oil leaks

Another_foto_of_the_old_air_lines
Another photo of the old air lines

Another_one_of_the_brake_boosters_that_has_to_be_replaced
Another one of the brake boosters that have to be replaced

Another_shot_of_the_repaired_steering_silinder
Another shot of the repaired steering cylinder

Back_part_of_water_pump_removed_from_engine
Back part of water pump removed from engine

Ball_joint_removed_to_remove_steering_box
Ball joint removed to remove steering box

Beneath_the_diesel_pump_near_the_bell_housing_showing_oil_leak
Beneath the diesel pump near the bell housing showing oil leak

Carry_axle_air_suspension_mount_was_benthere_being_repaired
Carry axle air suspension mount was bent - here being repaired

Close_up_section_to_be_replaced
Close up section to be replaced

Complete_diesel_pump_removed_for_oil_leak_repairs
Complete diesel pump removed for oil leak repairs

Compresoor_water_supply_also_showing_rust_and_blockage
Compessor water supply also showing rust and blockage

Compressor_back_in_place
Compressor back in place

Compressor_casing_cleaned_up_showing_the_crack
Compressor casing cleaned up showing the crack

Compressor_removed_to_repair_cracked_casing
Compressor removed to repair cracked casing

Cooling_fan_removed_to_remove_water_pump
Cooling fan removed to remove water pump

Damaged_steering_silinder_oil_hoses_to_be_replaced
Damaged steering cylinder oil hoses to be replaced

Diesel_pump_refitted_with_new_packings_showing_the_red_sealant
Diesel pump refitted with new packings showing the red sealant

Diesel_pump_with_many_visible_leaks
Diesel pump with many visible leaks

Engine_with_diesel_pump_removed
Engine with diesel pump removed

Front_of_engine_with_cooling_fan_removed
Front of engine with cooling fan removed

Front_part_of_waterpump_removed_showing_the_trail_of_leaking_water
Front part of waterpump removed showing the trail of leaking water

Just_in_front_of_thatanother_place
Just in front of that, another place

Left_hand_side_of_cab_rear_with_a_section_of_bad_rust
Left hand side of cab rear with a section of bad rust

More_of_the_cab_dents_repaired
More of the cab dents repaired

New_diafram_for_one_of_the_brake_boosters
New diagram for one of the brake boosters

New_front_bumper_fitted
New front bumper fitted

New_plate_also_welded_in_here
New plate also welded in here

New_plate_fully_welded
New plate fully welded

New_steering_silinder_hoses_fitted
New steering cylinder hoses fitted

Oil_cooler_cleaned_and_new_packings_installed
Oil cooler cleaned and new packings installed

Oil_cooler_removed_to_clean_rusted_water_ports_and_repair_oil_leaks
Oil cooler removed to clean rusted water ports and repair oil leaks

Oil_cooler_showing_the_oil_leak
Oil cooler showing the oil leak

OLd_front_bumper_with_pipe_cut_out
Old front bumper with pipe cut out

Old_PVC_air_lines_removed
Old PVC air lines removed

One_of_the_ball_joints_with_a_lot_of_dirt_in_the_grease
One of the ball joints with a lot of dirt in the grease

One_of_the_relined_brake_shoes
One of the relined brake shoes

Other_places_on_the_bonnet_to_be_repaired
Other places on the bonnet to be repaired

Refitting_the_compressor_after_repairing_the_crack_and_conrod
Refitting the compressor after repairing the crack and conrod

Replacing_winch_brake_drum
Replacing winch brake drum

Right_hand_corner_with_plate_replaced
Right hand corner with plate replaced

Rusted_section_replaced_with_new_plate
Rusted section replaced with new plate

Some_of_the_new_air_hoses_and_fittings_to_be_installed
Some of the new air hoses and fittings to be installed

Some_very_deep_rust_grinded_out_to_stop_further_decay
Some very deep rust grinded out to stop further decay

Steering_box_being_cleaned
Steering box being cleaned

Steering_box_opened_up_showing_some_water_mixed_in_the_oil
Steering box opened up showing some water mixed in the oil

Steering_box_refitted
Steering box refitted

Steering_box_with_all_parts_cleaned_ready_for_seals_and_packings_to_be_fitted
Steering box with all parts cleaned ready for seals and packings to be fitted

Steering_box_with_clearly_visible_oil_leaks
Steering box with clearly visible oil leaks

Steering_pump_removed_to_repair_oil_leak
Steering pump removed to repair oil leak

Steering_silinder_back_from_hydraulic_repairs_showing_were_they_welded_it
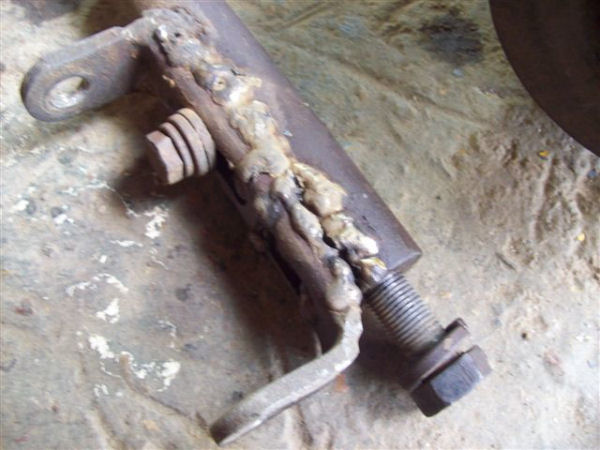
Steering cylinder back from hydraulic repairs showing where they welded it

Steering_silinder_refitted
Steering cylinder refitted

Steering_silinder_removed_to_have_new_seals_fitted
Steering cylinder removed to have new seals fitted

Steering_silinder_with_dust_seals_replaced
Steering cylinder with dust seals replaced

Steering_silinder_with_torn_dust_seal
Steering clylinder with torn dust seal

The_carry_axle_air_suspension_mount_top_piece_showing_how_much_it_was_bent
The carry axle air suspension mount top piece showing how much it was bent

The_compressor_with_piston_removed
The compressor with piston removed

The_corner_in_proses_of_sanding_down
The corner in process of sanding down

The_left_hand_corner_with_body_filler_aplied
The left hand corner with body filler applied

The_new_plate_tag_welded_in_position_after_all_rusted_parts_were_cut_out
The new plate tag welded in position after all rusted parts were cut out

The_new_water_pump_impeller_with_the_old_one_on_the_right
The new water pump impeller with the old one on the right

The_old_steering_silinder_hoses_removed
The old steering cylinder hoses removed

The_rear_of_the_cab_with_dents_repaired
The rear of the cab with dents repaired

The_reverse_side_of_the_impeller
The reverse side of the impeller

The_right_hand_coner_showing_a_hole_rusted_in_the_plate
The right hand corner showing a hole rusted in the plate

The_right_hand_corner_also_totally_rusted_away_with_old_body_filler_coming_off
The right hand corner also totally rusted away with old body filler coming off

The_spot_above_the_air_vent_repaired_with_body_filler
The spot above the air vent repaired with body filler

The_steering_box_spiral_removed_to_fit_new_seals
The steering box spiral removed to fit new seals

The_water_pump_shaft_with_cracked_seal_and_worn_impeller
The water pump shaft with cracked seal and worn impeller

Water_pump_splitted_to_remove_leaking_seal_and_worn_impeller
Water pump splitted to remove leaking seal and worn impeller

Winch_brake_drum_completed_and_outer_cover_replaced
Winch brake drum completed and outer cover replaced

Winch_brake_drum_shoes_relined_and_fitted
Winch brake drum shoes relined and fitted

Winch_brake_drum_with_inner_part_refitted
Winch brake drum with inner part refitted


Feedback from the War Train Article


Feedback on this subject has come from an unlikely source; Godwin Hampton wrote in from Malta with startling news! 

The article about the War Train is most interesting, especially since I now know that I have something made by the South Afrcan Railways! image001

The bipod taken from the Small Arms Training pamphlet No.9, 1939 and 1943 editions.
 
Well, about a year ago I bought a 3" Mortar bipod over the internet from a guy in Greece, and when it arrived and I took it to bits for blasting, the South African acceptance mark (a crow's foot mark inside a U) appeared.

image002

Crosshead, marked ML (Muzzle Loading) 3" MOR MK II*. SAR 1942
 
Now I know who made it.....and why it has the letters S.A.R hand stamped on it. The forgings have a mark which was a female on the die and so appears a male on the part. The mark consists of a capital B with the letter F inside the top half and the letter X inside the bottom half of the 'B'.


Now all I need for it are a base plate and a barrel!
 
How's that for GLOBALISATION...interesting to see how it is all coming together....
 
Thanks for providing interesting information,
 
Best Regards
 
Godwin Hampton

image003

 The forging mark can be clearly seen, and near the bore, a 90 and the Union of South Africa Government Equipment sign, a pheon in a capital U.

Can anybody give any clues as to the forging markings? Can anybody help Godwin with the rest of his mortar? He has sourced a sight in the Netherlands.

  image004 

The full Mortar, taken from the Small Arms Training pamphlet No.9, 1939 and 1943 editions.

In fact, the ‘crow’s foot’ is actually a broad arrow head, or ‘pheon’, used for around 500 years, maybe even longer, to identify government property. 

Andy Selfe

February 2010

Feedback on the Sandstone Heritage Trust Sherman

All along we’ve been referring to the Sherman in the Sandstone Heritage Trust collection simply as a 'Sherman Mk4'. Apparently, it’s not as simple as that, according to William Marshall, who knows his Military Vehicles well! 

 image001

Feedback from Sherman Tanks in World War II Article

On 28th January 2009, Friends of the Rail stalwart, Nathan Berelowitz wrote in: 

Hi, look at these amazing photos from a guy I met in Pretoria, whose dad was in the sixth armour and fought in Italy! Then and now!! 

Nathan

 The photos speak for themselves!

image001

Restoration of rare 3-axle Oshkosh Tank Transporter continues

Repairs to Oshkosh - 6 November to 21 December 2009

Jan Fouche has provided the following photographs with captions on the ongoing work to the Oshkosh.

Winch_spiraldrive_with_gear_and_broken_segments_of_brass_gear_removed
Winch spiraldrive with gear and broken segments of brass gear removed

We_had_the_drive_gear_pressed_to_remove_it_from_winch_spiraldrive_to_replace_oil_seal
We had the drive gear pressed to remove it from winch spiraldrive to replace oil seal

Right_front_fender_being_stripped_of_all_paint_and_torn_plate_welded
Right front fender being stripped of all paint and torn plate welded

Replacing_broken_winch_mounting_bolts
Replacing broken winch mounting bolts

Repair_kit_for_4way_valve
Repair kit for 4way valve

Rear_end_of_shassis_with_top_segment_plate_replaced
Rear end of chassis with stop segment plate replaced

Radiator_back_from_cleaning_and_repairs
Radiator back from cleaning and repairs

New_brake_booster_fitted_to_rear_diff
New brake booster fitted to rear diff

Left_front_fender_removed_to_repair_bent_mounting
Left front fender removed to repair bent mounting

Left_front_fender_ready_to_remove_paint
Left front fender ready to remove paint

Leaking_4way_valve_stripped_for_repair
Leaking 4way valve stripped for repair

Front_view_showing_both_fenders_removed_for_cleaning_and_repairs
Front view showing both fenders removed for cleaning and repairs

Floor_cover_plate_removed__to_repair_oil_leaks_and_leaking_splitter_valve
Floor cover plate removed to repair oil leaks and leaking splitter valve

Broken_handbrake_override_valve_on_the_right_and_new_replcement_on_the_left
Broken handbrake override valve on the right and new replacement on the left

Broken_brake_booster_srtipped_and_found_that_it_had_to_be_replaced
Broken brake booster stripped and found that it had to be replaced

Bottom_segment_plate_also_repleced
Bottom segment plate also replaced


Shermans with SA Troops in WW2

thumbSherman Tanks played an important part with the South African troops in the World War II campaign in Italy. The following information is taken from the book South Africa in World War II, A Pictorial History, edited by John Keene of the SA National Museum of Military History.

'During November (1943) the (6th) SA Armoured Division was ordered to rest as many troops as possible in order to prepare for an attack on Monte Sole. Field Marshall Alexander visited the division on 4 November. The armoured regiments were re-equipped with Sherman tanks mounting 76mm and 17-pounder guns and 4th/22nd Field Regiment, SA Artillery, was equipped with Sextons (self-propelled 25-pounder guns). The warning order for the division to prepare for operations against Monte Sole was received on 30 November......'

Sandstone commences project to restore M20 Diamond T Horse and M9 Rogers Tank Transporter

Sandstone Heritage Trust has recently reached an agreement with the Armour Museum, Bloemfontein to restore an M20 Diamond T Tractor Unit and an M9 Rogers trailer , the combination being designated the 'M19 Tank Transporter'.

image001 

Between 1941 and 1945 about 6,554 M19 tank transporters were built to British specifications by the Diamond T Motor Car Company. The USA and the Soviet Union also used these vehicles. The combination of M20 tractor and 40/45 ton Rogers M9 trailer was capable of transporting all tanks then in use, so that even 30 years after the war these vehicles were still in service with Western armies including the German army.

image002

The Diamond T was initially a marque of touring car with models up to 70 hp. The company later became known for its trucks. During World War 2, Diamond T produced a classic heavy truck in the model 980/981, a prime mover (tractor unit) which was quickly snapped up by the British Purchasing Commission for duty as a tank transporter tractor. Coupled with a Rogers trailer, the Diamond T gave sterling service with the British Army in North Africa, where its power and rugged construction allowed the rescue of damaged tanks in the most demanding of conditions.

image003

By 1967, as a subsidiary of White Motor Company, Diamond T was merged with Reo Motor Company to become Diamond Reo Trucks, Inc.

image004

Two Diamond T tractors with the correct specification trailed low bed units have been delivered to the Sandstone Heritage Trust workshops for restoration. This is in terms of an ongoing agreement we have with the Armour Museum in Bloemfontein to assist them with collecting, restoring, demonstrating and displaying Classic Military Vehicles with a South African historical background.

image005

We have been fortunate in being able to trace manuals on the combination which have been purchased so that our technical personnel can restore them correctly. See this link.

image006

On the following web site...

http://www.mheaust.com.au/IDF/Research/TT/DIAMOND%20T.JPG

...there is an excellent photograph of a restored Diamond T and Samson & Rogers trailer (identical to the one that we are restoring) which gives a good indication of what they look like when they are restored.

image007

A model kit is also available for the M20 Diamond T low bed and M9 Rogers trailer on link: http://www.revell.de/manual/03226.PDF.

At the same time, friends in Malta are tackling the restoration of a similar trailer, rescued recently from the scrapman. Here is a dramatic photographic sequence of the rescue:

image008

image009

image010

image011

image012

We hope to compare notes during the restoration!

One can already imagine Sandstone Heritage Trust's Mk IV Sherman loaded on the M19 Tank Transporter!