Military Vehicles

SHT enjoys a close working relationship with the SA Armour Museum

SHT enjoys a close working relationship with the SA Armour Museum

Sandstone Heritage Trust enjoys a close working relationship with the SA Armour Museum, based at the School of Armour in Tempe, Bloemfontein.

image001

The Museum consists of the following:

An exterior display of Armoured Fighting Vehicles (within the lines of the School of Armour and 1 SA Tank Regiment)
A vehicle hangar with several restored vehicles in running order – Lesakeng
A National Monument with Indoor displays
An auditorium - the 2 SSB Room
The Garrison Hall
The Wall of Remembrance
An Annex - Hull-Down - with indoor displays
A Research Library
A Museum Shop - The Gun Barrel

Now the Museum has launched a Fund Raising scheme.

Dear Friends of the SA Armour Museum,
 
We trust that you enjoyed the SA Armour Progress Report ?? (will it also be published?) that you received recently and also enjoyed the Museum website at: http://www.saarmourmuseum.co.za/index.html.

The guys in Bloemfontein are doing an incredible job to preserve our Armour Heritage.

They really deserve our wholehearted support!
 
Why don't we all consider to adopt a brick in Lesakeng and support the museum in this way?  We can adopt a brick (or a wall) for ourselves, but why not for all our family members as well?
 
Such a small contribution can go a long way towards cementing our Heritage and supporting the hardworking and loyal team in Bloemfontein.
 
Please consider this!

If you are willing to support this worthy cause kindly complete the attached "Adopt a Brick Letter" and email it to the School of Armour at This email address is being protected from spambots. You need JavaScript enabled to view it.. Payment can be done via Electronic Funds Transfer (EFT). See banking details on Adopt-a-Brick letter/application form.

We thank you for your kind consideration.

Yours in Armour!

Click here to download Adopt-a-Brick letter/application form - 75KB PDF (opens in new window)

SA Armour Museum progress report

SA Armour Museum progress report

The Sandstone Heritage Trust has a formal working agreement with the SA Armour Museum. We have attached a copy of their progress report dated July 2010.

We draw attention to the banner that was displayed at the Bloemfontein Show.

Image1

Click here to view the report - 1MB PDF (opens in a new window)

Military Archive photos

Military Archive photos

Louis Boshoff, one of our supporters, has sent us these pictures which he obtained from the military archives in Pretoria.

871001133

scan0021

scan0022

Photos kindly supplied by SANDF documentation centre

Louis used to be a recovery vehicle driver during his Army days.

Thanks Louis, keep them coming!

Military items arrive back from the Bloemfontein Show

Military items arrive back from the Bloemfontein Show

After the success of the Bloemfontein Show our trusty driver Thabiso has collected the two military items, namely the 88mm Anti-Aircraft gun and the Saracen, and they are safely back in the collection.

p8001

p8002

p8003

p8004

Sandstone Heritage Trust supports SA Armour Museum at Bloemfontein show

Sandstone Heritage Trust supports SA Armour Museum at Bloemfontein show.

Oshkosh Tank Transporter all but complete...

Oshkosh Tank Transporter all but complete...

Jan Fouche has provided the following photographs and captions on the ongoing work of the Oshkosh Tank Transporter.

6th May 2010

The_new_hoodlining
The new hoodlining

The_repaired_side_panel_refitted
The repaired side panel refitted

Wheel_hub_removed_and_broken_studs_replaced
Wheel hub removed and broken studs replaced

Wheel_stud_tips_cover_in_red_for_the_military_touch
Wheel stud tips cover in red for the military touch!

Winch_chain_cover_primed_and_refitted
Winch chain cover primed and refitted

One_rim_was_broken_and_was_repaired
One rim was broken and was repaired

Left_hand_side_showing_the_side_cover_and_bonnet_refitted
Left hand side showing the side cover and bonnet refitted

New_24volt_alternator_fitted
New 24volt alternator fitted

New_air_suspension_bags_fitted
New air suspension bags fitted

New_tail_lights_and_original_registration_plate_fitted
New tail lights and original registration plate fitted

Right_rear_view_with_rear_arches_repainted
Right rear view with rear arches repainted

Radiator_grille_refitted_also_showing_the_new_front_bumper
Radiator grill refitted also showing the new front bumper

Rear_winch_roller_and_side_cover_plates_repaired
Rear winch roller and side cover plates repaired

Reinforcing_frame_welded_into_back_of_side_cover
Reinforcing frame welded into back of side cover

Right_front_hub_partly_repainted
Right front hub partly repainted

Inside_of_cabfully_refurbished
Inside of cab, fully refurbished

All_of_the_rechromed_parts_refitted
All of the rechromed parts refitted

All_the_wheels_were_removed_to_clean_hubs_before_painting
All the wheels were removed to clean hubs before painting

Bodyfiller_applied_to_engine_side_cover
Bodyfiller applied to engine side cover

Front_view_with_truck_completely_repaintedback_to_its_former_glory
Front view with truck completely repainted, back to its former glory!

The_bonnet_now_also_in_place
The bonnet now also in place

Side_cover_finished_and_coated_with_MS_primer
Side cover finished and coated with MS primer

Some_wheel_studs_were_broken
Some wheel studs were broken Starter motor removed to fit new brushes and contacts

The_air_cleaner_housing_refitted
The air cleaner housing refitted


Update on the restoration of rare 3-axle Oshkosh Tank Transporter

31st March 2010

Jan Fouche has provided the following photographs and captions on the ongoing work of the Oshkosh.

Alternator_removed_to_repair_broken_mounting
Alternator removed to repair broken mounting

Battery_box_repaired_and_primed
Battery box repaired and primed

Battery_box_with_floor_panel_badly_rusted
Battery box with floor panel badly rusted

Battery_box_with_rusted_floorplate_cut_out
Battery box with rusted floorplate cut out

Cab_interior_with_old_carpeting_being_removed
Cab interior with old carpeting being removed

Cab_top_ventilator_coated_with_MS_Primer
Cab top ventilator coated with MS Primer

Exhaust_cleaned_up_and_new_flexible_hose_to_be_fitted
Exhaust cleaned up and new flexible hose to be fitted

Front_fender_with_body_filler_applied_to_small_dents
Front fender with body filler applied to small dents

Front_of_truck_with_radiator_and_fender_refitted
Front of truck with radiator and fender refitted

Front_of_truck_with_radiator_refitted
Front of truck with radiator refitted

Instrement_panel_with_some_gauges_removed_to_repair_and_cleaned
Instrument panel with some gauges removed to repair and be cleaned

Left_front_fender_in_position
Left front fender in position

Left_front_fender_with_MS_Primer_applied
Left front fender with MS Primer applied

Left_front_side_now_ready_to_be_painted
Left front side now ready to be painted

New_baseplate_for_battery_box_mounting_coated_with_primer
New baseplate for battery box mounting coated with primer

New_battry_box_cover_witch_also_acts_as_the_step_on_the_right_hand_side
New battery box cover which also acts as the step on the right hand side

One_of_the_old_gauges_repaired_and_cleaned_up_ready_to_be_refitted
One of the old gauges repaired and cleaned up ready to be refitted

Right_front_fender_back_in_place
Right front fender back in place

Right_front_fender_coated_with_MS_Primer
Right front fender coated with MS Primer

Right_front_side_almost_ready_to_be_repainted
Right front side almost ready to be repainted

Some_new_gauges_fitted
Some new gauges fitted

The_battery_box_with_one_of_the_corners_welded
The battery box with one of the corners welded

The_broken_alternator_mounting
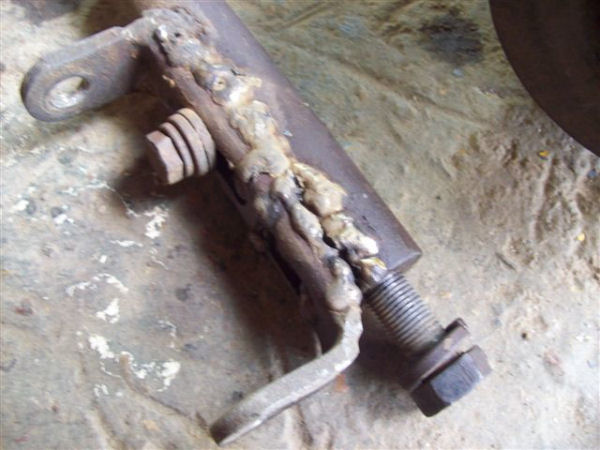
The broken alternator mounting

The_cab_coated_with_MS_Primer
The cab coated with MS Primer

The_exhaust_pipe_with_rusted_flexible_hose_cut_off
The exhaust pipe with rusted flexible hose cut off

The_exhaust_welded_together_and_refitted
The exhaust welded together and refitted

The_front_of_the_truck_now_looking_much_better
The front of the truck now looking much better

The_fuel_tank_cleaned_inside_and_sprayed_with_primer
The fuel tank cleaned inside and sprayed with primer

The_fuel_tank_refitted_to_the_truck
The fuel tank refitted to the truck

The_other_front_fender_being_repaired_with_body_filler
The other front fender being repaired with body filler

The_rusted_battery_box_floorplate
The rusted battery box floorplate


HTN 63 - Army spec Bedford found along the Garden Route in the Cape - to be fully converted

Sandstone Heritage Trust - News

HTN 63 - Army spec Bedford found along the Garden Route in the Cape - to be fully converted

17th March 2005
While the Sandstone Heritage Trust is not concentrated on old commercial vehicles, we do have some interesting old items. For example South Africa’s oldest commercial vehicle – a 1910 Peerless is part of our commercial vehicle collection. We have spent a lot of time looking for a suitable army spec Bedford.

We found this one along the Garden Route in the Cape. It is a military spec that has been converted for use in a mining application.

During 2006 it will be re-converted to a full spec Military Bedford.
01
Below is a picture of two of our military commercial vehicles already restored –
a Diamond T and a 1942 Dodge Power Wagon.
02

HTN 91 - It goes around Earphones and Helmets.

Sandstone Heritage Trust - News

HTN 91 - It goes around Earphones and Helmets.

22nd May 2006

Anybody who was in the Armoured Corps at that time, knows that wearing earphones (for both the radio and the Armoured Car's intercom) at the same time as a steel helmet, consisting of a plastic liner 'mosdop', and the steel outer 'staaldak', will tell you that it's somewhere between very uncomfortable, and impossible.

Parade ground photos of men in tanks and armoured cars, wearing black berets and shiny silver badges, with earphones on top, look very smart. But these photos were taken under operational conditions on the Northern border of South West Africa, now Namibia, where wearing a helmet was an unpleasant necessity! The earphones had to be squeezed in under the headband of the helmet, with the strap which was supposed to be over the top of your head, hanging down behind your ears, which in turn were being pushed downwards by the rubber mouldings of the earpieces!

Our Sergeant hit on the idea of 'borrowing' aircraft type helmets from the lads in light blue, and supported his suggestion to the top brass with these photographs.
01

These were taken in the days before these locally made Armoured Cars were called Elands. This was called a VA Mk3 / 60, equipped with a 60mm Breech Loading Mortar as main armament. Crew Commander (Cpl Selfe) sits in the turret on the left, his Gunner (Trooper Bezuidenhout) on his right, and Driver (Trooper Kleynhans) in the hull.
02
Looking much more comfortable and professional are Cpl Pretorius's crew in a VA Mk3 / 90. This is the same model as the one in the Sandstone Heritage collection, with the 90mm DEFA gun.

Just to show Armoured Cars run in the blood, attached is a photograph of my father, also as Crew Commander (below, in the middle) in May 1942, outside Gazala in the Western Desert. They are sitting on a Marmon Harrington Mark 4, one of 5 746 which were also made in South Africa.

Andy Selfe
03

BTW, do you know how the School of Armour / 1 Special Service Battalion works, or used to? School of Armour is the place where Officer and NCO 'material' was sent, like an Army Gymnasium, a few months prior to a normal intake into 1SSB. The unsuccessful candidates were 'Returned ot Unit' to us in 1SSB. Those who 'made it' came down to us as our officers and NCOs. Some of us who showed promise, were promoted 'out of the ranks' from 1SSB itself.

1SSB had mostly Armoured Car squadrons, and less Tank Squadrons. Much rivalry existed!
 

Carrying on with the restoration of rare 3-axle Oshkosh Tank Transporter


1st March 2010

Like so many projects, particularly vehicles, they often look better than they really are. Jan Fouche has sent us a plentiful supply of good photographs clearly indicating the amount of detailed restoration work that has been dealt with. For people who leave things standing outside be aware that you will pay the price in due course if you ever decide to restore it.

The photographs give a good account of the work that is involved.

A_rusted_section_of_the_bonnet_to_be_cut_out
A rusted section of the bonnet to be cut out

A_section_on_the_other_side_of_the_bonnet_cut_out
A section of the other side of the bonnet cut out

A_spot_cleaned_up_to_remove_rust_and_repair_with_body_filler
A spot cleaned up to remove rust and repair with body filler

Air_compressor_housing_with_a_crack_leaking_water
Air compressor housing with a crack leaking water

Air_compressor_piston_and_conrod_removed_to_repair_stripped_conrod_bolt
Air compressor piston and conrod removed to repair stripped conrod bolt

Air_compressor_water_supply_hose_completly_blocked_causing_overheating
Air compressor water supply hose completely blocked causing overheating

Another_angle_of_the_bumper
Another angle of the bumper

Another_angle_of_the_diesel_pump
Another angle of the diesel pump

Another_angle_of_the_steering_box
Another angle of the steering box

Another_foto_of_the_oil_leaks
Another photo of the oil leaks

Another_foto_of_the_old_air_lines
Another photo of the old air lines

Another_one_of_the_brake_boosters_that_has_to_be_replaced
Another one of the brake boosters that have to be replaced

Another_shot_of_the_repaired_steering_silinder
Another shot of the repaired steering cylinder

Back_part_of_water_pump_removed_from_engine
Back part of water pump removed from engine

Ball_joint_removed_to_remove_steering_box
Ball joint removed to remove steering box

Beneath_the_diesel_pump_near_the_bell_housing_showing_oil_leak
Beneath the diesel pump near the bell housing showing oil leak

Carry_axle_air_suspension_mount_was_benthere_being_repaired
Carry axle air suspension mount was bent - here being repaired

Close_up_section_to_be_replaced
Close up section to be replaced

Complete_diesel_pump_removed_for_oil_leak_repairs
Complete diesel pump removed for oil leak repairs

Compresoor_water_supply_also_showing_rust_and_blockage
Compessor water supply also showing rust and blockage

Compressor_back_in_place
Compressor back in place

Compressor_casing_cleaned_up_showing_the_crack
Compressor casing cleaned up showing the crack

Compressor_removed_to_repair_cracked_casing
Compressor removed to repair cracked casing

Cooling_fan_removed_to_remove_water_pump
Cooling fan removed to remove water pump

Damaged_steering_silinder_oil_hoses_to_be_replaced
Damaged steering cylinder oil hoses to be replaced

Diesel_pump_refitted_with_new_packings_showing_the_red_sealant
Diesel pump refitted with new packings showing the red sealant

Diesel_pump_with_many_visible_leaks
Diesel pump with many visible leaks

Engine_with_diesel_pump_removed
Engine with diesel pump removed

Front_of_engine_with_cooling_fan_removed
Front of engine with cooling fan removed

Front_part_of_waterpump_removed_showing_the_trail_of_leaking_water
Front part of waterpump removed showing the trail of leaking water

Just_in_front_of_thatanother_place
Just in front of that, another place

Left_hand_side_of_cab_rear_with_a_section_of_bad_rust
Left hand side of cab rear with a section of bad rust

More_of_the_cab_dents_repaired
More of the cab dents repaired

New_diafram_for_one_of_the_brake_boosters
New diagram for one of the brake boosters

New_front_bumper_fitted
New front bumper fitted

New_plate_also_welded_in_here
New plate also welded in here

New_plate_fully_welded
New plate fully welded

New_steering_silinder_hoses_fitted
New steering cylinder hoses fitted

Oil_cooler_cleaned_and_new_packings_installed
Oil cooler cleaned and new packings installed

Oil_cooler_removed_to_clean_rusted_water_ports_and_repair_oil_leaks
Oil cooler removed to clean rusted water ports and repair oil leaks

Oil_cooler_showing_the_oil_leak
Oil cooler showing the oil leak

OLd_front_bumper_with_pipe_cut_out
Old front bumper with pipe cut out

Old_PVC_air_lines_removed
Old PVC air lines removed

One_of_the_ball_joints_with_a_lot_of_dirt_in_the_grease
One of the ball joints with a lot of dirt in the grease

One_of_the_relined_brake_shoes
One of the relined brake shoes

Other_places_on_the_bonnet_to_be_repaired
Other places on the bonnet to be repaired

Refitting_the_compressor_after_repairing_the_crack_and_conrod
Refitting the compressor after repairing the crack and conrod

Replacing_winch_brake_drum
Replacing winch brake drum

Right_hand_corner_with_plate_replaced
Right hand corner with plate replaced

Rusted_section_replaced_with_new_plate
Rusted section replaced with new plate

Some_of_the_new_air_hoses_and_fittings_to_be_installed
Some of the new air hoses and fittings to be installed

Some_very_deep_rust_grinded_out_to_stop_further_decay
Some very deep rust grinded out to stop further decay

Steering_box_being_cleaned
Steering box being cleaned

Steering_box_opened_up_showing_some_water_mixed_in_the_oil
Steering box opened up showing some water mixed in the oil

Steering_box_refitted
Steering box refitted

Steering_box_with_all_parts_cleaned_ready_for_seals_and_packings_to_be_fitted
Steering box with all parts cleaned ready for seals and packings to be fitted

Steering_box_with_clearly_visible_oil_leaks
Steering box with clearly visible oil leaks

Steering_pump_removed_to_repair_oil_leak
Steering pump removed to repair oil leak

Steering_silinder_back_from_hydraulic_repairs_showing_were_they_welded_it
Steering cylinder back from hydraulic repairs showing where they welded it

Steering_silinder_refitted
Steering cylinder refitted

Steering_silinder_removed_to_have_new_seals_fitted
Steering cylinder removed to have new seals fitted

Steering_silinder_with_dust_seals_replaced
Steering cylinder with dust seals replaced

Steering_silinder_with_torn_dust_seal
Steering clylinder with torn dust seal

The_carry_axle_air_suspension_mount_top_piece_showing_how_much_it_was_bent
The carry axle air suspension mount top piece showing how much it was bent

The_compressor_with_piston_removed
The compressor with piston removed

The_corner_in_proses_of_sanding_down
The corner in process of sanding down

The_left_hand_corner_with_body_filler_aplied
The left hand corner with body filler applied

The_new_plate_tag_welded_in_position_after_all_rusted_parts_were_cut_out
The new plate tag welded in position after all rusted parts were cut out

The_new_water_pump_impeller_with_the_old_one_on_the_right
The new water pump impeller with the old one on the right

The_old_steering_silinder_hoses_removed
The old steering cylinder hoses removed

The_rear_of_the_cab_with_dents_repaired
The rear of the cab with dents repaired

The_reverse_side_of_the_impeller
The reverse side of the impeller

The_right_hand_coner_showing_a_hole_rusted_in_the_plate
The right hand corner showing a hole rusted in the plate

The_right_hand_corner_also_totally_rusted_away_with_old_body_filler_coming_off
The right hand corner also totally rusted away with old body filler coming off

The_spot_above_the_air_vent_repaired_with_body_filler
The spot above the air vent repaired with body filler

The_steering_box_spiral_removed_to_fit_new_seals
The steering box spiral removed to fit new seals

The_water_pump_shaft_with_cracked_seal_and_worn_impeller
The water pump shaft with cracked seal and worn impeller

Water_pump_splitted_to_remove_leaking_seal_and_worn_impeller
Water pump splitted to remove leaking seal and worn impeller

Winch_brake_drum_completed_and_outer_cover_replaced
Winch brake drum completed and outer cover replaced

Winch_brake_drum_shoes_relined_and_fitted
Winch brake drum shoes relined and fitted

Winch_brake_drum_with_inner_part_refitted
Winch brake drum with inner part refitted